Currently reading:
ECU Corroded Pins

Discuss ECU Corroded Pins in the Auto Electrician Forum area at ElectriciansForums.net

Marvo

-
Staff member
Mod
Mentor
Esteemed
Supporter
Reaction score
10,329
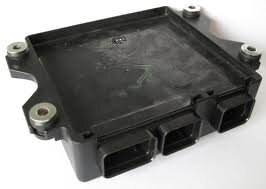
I have an ECU that has 2 x corroded pins that have broken clean off. It's from a jet ski and a new ECU isn't an option. At some stage sea water must have leaked past the seals on the plug and the rest is history :(

The ECU is a hard plastic enclosure and it's filled with a high density rubber potting agent of some kind so I really don't fancy my chances of being able to open it up without damaging it.

Just wondered if anyone had any ideas on how I can repair the pins. They've broken off flush with the back of the socket so there's nothing protruding that I can solder to. My best plan was to take it to a watch maker and see if he could drill and thread the broken pins and screw on an extension pin but I think this would be a long shot.
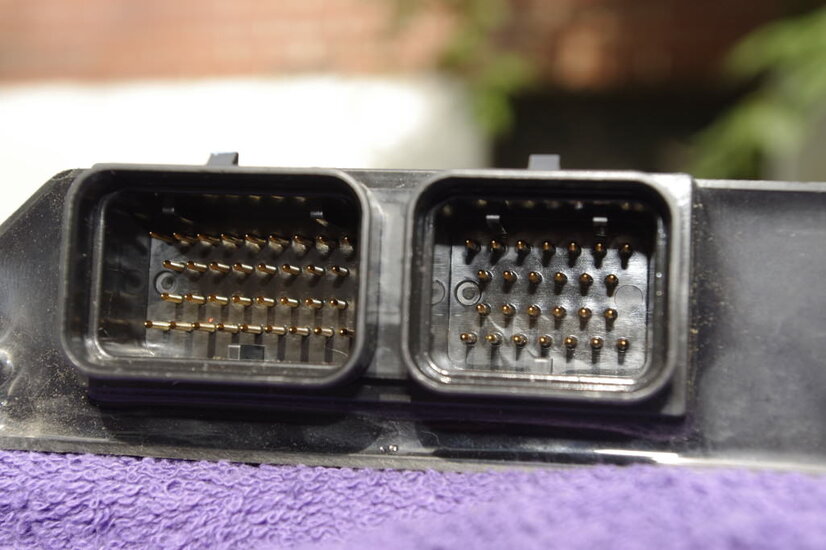
ECU.jpg
This is what the socket would look like in good condition
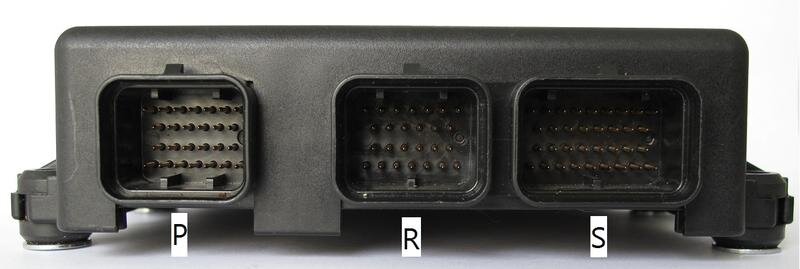

ecu1.jpg
This is what the back of the ECU looks like.
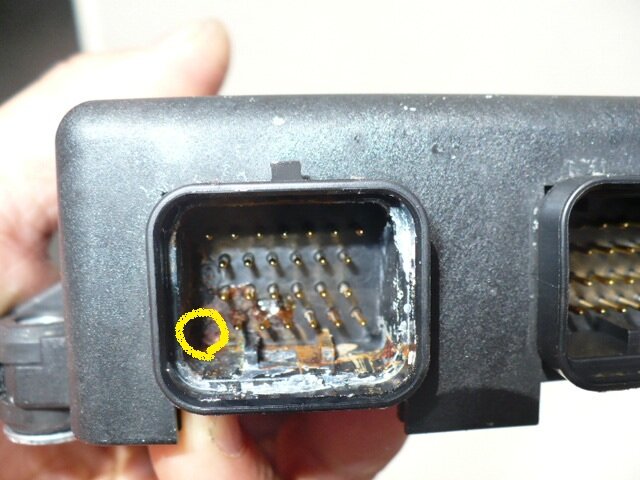

ecu 3.jpg
This is what the corroded socket looks like.

ECU Potting.jpeg
The ECU is potted in solid rubber.
 
I have an ECU that has 2 x corroded pins that have broken clean off. It's from a jet ski and a new ECU isn't an option. At some stage sea water must have leaked past the seals on the plug and the rest is history :(

The ECU is a hard plastic enclosure and it's filled with a high density rubber potting agent of some kind so I really don't fancy my chances of being able to open it up without damaging it.

Just wondered if anyone had any ideas on how I can repair the pins. They've broken off flush with the back of the socket so there's nothing protruding that I can solder to. My best plan was to take it to a watch maker and see if he could drill and thread the broken pins and screw on an extension pin but I think this would be a long shot.

View attachment 25578
This is what the socket would look like in good condition


View attachment 25579
This is what the back of the ECU looks like.


View attachment 25581
This is what the corroded socket looks like.


View attachment 25580
The ECU is potted in solid rubber.


I think drilling it out is the only viable option.

As for tapping it and screwing a new piece in it is something I used to be capable of in my original trade and from the piccie I think it would be something like 8BA or even smaller 10BA. DON'T ask what that is in cillimetres!!

The other way is to drill it and solder a peg in it -get the peg nice & hot, tin it & pop it in the hole. The worry here is if the remains of the old pin gets too hot it may cause damage to something else on the other end of it. Not very likely to be honest, but still worth bearing in mind.

Of course if you hadn't been so daft as to put your jet ski in the water in the first place you wouldn't have broken it. :)
 
ecu in a jet ski. whatever next..... windoze8 in a moped?
 
I would tend to go with the drill out and solder approach, I am not sure of scale but that looks like a lot less than 10BA and engineers taps are expensive.

Aye .... it's hard to tell from the piccies what size you can get away with.

12BA was the smallest I ever used BUT I once visited a bloke who had a workshop in his shed where he made 25BA screws - and the nuts to fit them!!

He had a Government contract to make and supply them and had to make his own machines to produce them.
 
I have this to contend with regularly on fixed and mobile plant,where the multi plug is sealed,yet the moisture tracks,sometimes 5 meters inside the cable and straight to the receptacle,oil too,on occasion. The problem is ensuring the receptacle is ok,and then matching the pin size exactly to fit said item. My preferred method on these occasions,is to gain a bit of clearance around the pin,if broken flush,using a hollow drill (easily made yourself) or dremel,solder a length of suitable similar sized cable on to the stub,then remove the corresponding individual females out of the plug. You can then thread as many renewed cables through the vacant ports as you offer up and engage the plug. Your IP improvement can be whatever suits the application,in your case,seawater will require maybe Vaseline or similar. I use this method,or any useful variation on it,on many occasions where either emergency or expense prompt, old school engineering. Of course,Seadoo will sell you a new ECU and loom,but that's a whole lot of fun-juice...(petrol,gas.....not owt' rude) :stooge_curly:
 
Thanks for the suggestions. The diameter of the pins is very small, probably less than 0.5mm so drilling them and threading them myself isn't possible with the machines I have in my workshop, hence I was going to maybe try a watchmaker.

I did have a plan-B which as PEG suggested involved using a hollow drill to remove some of the surrounding plastic at the back of the socket around the broken pins to make them protrude enough to try to solder a sleeve over them and extend them that way. I actually went past a scrap yard this afternoon and removed a complete ECU plug from a vehicle in the hope of being able to make a hollow drill out of one of the female pins by basically cutting a notch in the end of it. The female pin would also make a good sleeve to couple a new pin onto to increase the length. Alternatively I could just solder a wire onto it and make a permanent connection with the loom. The only problem I was thinking about is if the pins on the ECU are gold plated or similar then they may not take normal solder but I'll cross that bridge if I come to it unless anyone has experience or suggestions.

Thanks again.
 
Is there no way of getting to the back of the connector? Ideally you might be able to extract the broken pins and crimp or solder some new ones on, effectively making it as good as new.
 
The back of the connector is completely potted in a hard rubber compound. To dig the potting compound out would probably cause extensive damage.
 
Hi dude,with reference to the gold plating,this can be removed with a bit of work using a riffler file. These are curious shaped files used in industries such as die-making,and are readily available,some of mine i purchased at a steam engine rally tool stand 30+ years ago! I have also found a USB microscope and the lap-top very useful in these fiddly instances,most recently during a stamina-sapping marathon of rebuilding a Mercedes fuse/control board that had 5 layers of PCB buried under the top matrix. If you watch Mad Max,the Thunderdome,i'm the mechanic dangling in the harness... or,i need to get out more...:stooge_curly:
 
A variation on a previous suggestion, hollow drill to give clearance around the broken pin then use a crimp on socket as used in multiway plugs such as Harting that is a reasonable fit over the "stub", remove corresponding connection and feed wire back through plug, this approach would allow the ECU to be unplugged in future?.
 
An off the wall approach attach a male pin to a spring and fit the spring over the female pin with the male pin inside it but sprung out so that when the plug is pushed together the sprung pin presses on the (smoothed) stub, not good for high current but may be OK for a control connection.
Spring loaded pin.jpg
 
Thanks for the suggestions.

At the moment the broken pin is flush with the back wall of the socket, if anything the corrosion might have gone slightly below flush and even if I manage to use a hollow drill to remove some of the plastic material surrounding the broken pin I think I'll only have a protrusion of a millimeter or two to play with. I might just get enough to install some kind of sub-minature crimp but I don't think there will be sufficient for a sprung pin connection or any other similar mechanical connection to make stable contact.
 
You really would have to drill it out, and hope there is enough pin behind the plastic to work with, the link I gave is for the micro size drills, and if you were not keen on the solder idea then you could, if you were careful, manage to just do a friction fit into the drilled hole, if you turn / sand down the end of a pin (of the correct od) to the size of the hole but taper it, it could be drifted into place.
 
I'm going to attempt to excavate around the broken pins with a hollow drill this weekend and see how much pin material I can get, this will probably determine my options for repair. Drilling a hole in the center of the pin won't be possible for me to do, I don't have the equipment or the eyesight :). I would need to fabricate a guide to go over the remains of the pin to keep the drill on center and I don't have a drill capable of running a bit that's 0.3mm or thereabouts. I'm really no good at sub-miniature work.
 
I'm going to attempt to excavate around the broken pins with a hollow drill this weekend and see how much pin material I can get, this will probably determine my options for repair. Drilling a hole in the center of the pin won't be possible for me to do, I don't have the equipment or the eyesight :). I would need to fabricate a guide to go over the remains of the pin to keep the drill on center and I don't have a drill capable of running a bit that's 0.3mm or thereabouts. I'm really no good at sub-miniature work.

For what it's worth I think that's the best option. ;)
 
I actually thought about getting a similar sized pin of some sort and basically knocking it in 5-10mm down the side of the broken pin. It's a bit hit and miss though and if it doesn't work it could make any subsequent repair more difficult.
 
If it was me I would be inclined to do as you say excavate around the pins and gain enough to solder on to and if successful , i would then solder wires on all the remaining pins , thing you have to be careful of though is any delicate components inside with the heat of soldering . If not successful you would have nothing to lose then you might as well excavate right into the unit...
 
Okay, I finally got around to this yesterday. I managed to excavate around the broken pins with a home-made hollow drill and I soldered wires onto both the broken pins. The corrosion was quite deep and I had to excavate about 8 or 9mm to unearth sufficient bright metal to solder on to, it was deeper than I intended going but luckily I didn't hit any circuit boards or components whilst digging. I removed the corresponding pin in the plug and threaded the wires through the plugs as they were reconnected to the ECU. I then manually joined to two new wires to the two now loose wires on the loom. Probably not the most professional job but fairly effective, I wanted to play it safe and drilling the broken pins wasn't going to be easy.

I couldn't run the motor for long because it was out of water but it started and ran for a couple of minutes like a brand new one so I'm going to grease pack all the plugs and get some rubber potting agent to patch up the holes in the plugs where the wires come out. I should get it all done this week and depending on the weather I'll get suited up and give it a test run in the sea next weekend.
 
i hope you've done a full set of tests on the new wires and completed a cert. to SAS7671 or whatever it is down there.:grin:
 
Thankfully the work falls outside the scope of our local installation regs. I am a little worried about it breakng down again, last time it took me over 20 mins to swim to shore and the water was bloody cold.
 
you'd have done it in 5 if you had a shark snapping at your arse.
 
Thankfully the work falls outside the scope of our local installation regs. I am a little worried about it breakng down again, last time it took me over 20 mins to swim to shore and the water was bloody cold.


I never learned to swim and I'm a Pisces - coincidently so is Tidyboiler and she can't swim either and we both have a fear of boiling oil.
 
Well I finally have an update.

It's the first day of spring and what a stunning day it was, it touched 28C around 12.30 and not a cloud in sight all day. I was on site in meetings this morning but I managed an hour on the beach a kilometer up the road from site. I like getting wet at lunch time, the waves weren't big enough to surf so I just had a swim and did some snorkeling.

This evening I took the jetski to my local beach and it's running well. I did a few Km's on it in mild swell and not even a hicup. I'll see if I have time this weekend to get it into some more convincing swells but I've got confidence it will be fine. I hauled it out of the water just in time to get a ringside seat to a stunning sunset with a frosty beer i my hand.
 
Hmm
I might have thanked and liked that post if you had left it at
"This evening I took the jetski to my local beach and it's running well. I did a few Km's on it in mild swell and not even a hicup. I'll see if I have time this weekend to get it into some more convincing swells but I've got confidence it will be fine."

Posting the rest on a cold, dreary, wet English day is just too mean
:cry_smile::sad_smile::30:!
 

Reply to ECU Corroded Pins in the Auto Electrician Forum area at ElectriciansForums.net

OFFICIAL SPONSORS

Electrical Goods - Electrical Tools - Brand Names Electrician Courses Green Electrical Goods PCB Way Electrical Goods - Electrical Tools - Brand Names Pushfit Wire Connectors Electric Underfloor Heating Electrician Courses
These Official Forum Sponsors May Provide Discounts to Regular Forum Members - If you would like to sponsor us then CLICK HERE and post a thread with who you are, and we'll send you some stats etc

YOUR Unread Posts

This website was designed, optimised and is hosted by untold.media Operating under the name Untold Media since 2001.
Back
Top
AdBlock Detected

We get it, advertisements are annoying!

Sure, ad-blocking software does a great job at blocking ads, but it also blocks useful features of our website. For the best site experience please disable your AdBlocker.

I've Disabled AdBlock