May be worth you buying some standard DIP 555 chips?

Or surface mount devices with an adaptor as per Marconi above. Good solution this.

Or in the past I've glued the surface mount type to a board (piece of plastic etc.) and soldered wires directly to the pins. Use track repair wire or similar fine gauge wire.
 
I have both versions DIP8 and SOP8.
For SOP8 I have 100pcs and I really want to use them.
Thanks for your suggestions so far. The adaptor is a good solution, but Ill have to buy it and it takes time to arrive. I want to build this thing these days.
In the end I will experiment more and also use your ideas as well, with glue.
Any other ideas are welcomed.
Also... can you show me your SMD iron tips that you use? Or any other soldering tools specific for smd? The big tip that I have is too much, and is harder with it to get in the right spot, especially if I want to stick wires to the pins. I can do it in the end, but with great effort.
 
Last edited:
  • Like
Reactions: DPG
If you are happy with the functionality you get from the breadboard right now, it is time to make it on fiberglass board. It's probably a good advice for you, to make it as a definitive project. And dismantle everything you have here on these breadboards. I did the same. Remember the movie where I presented the remote control receiver? It was breadboarded. Now is gone, breadboard is clean again, ready for other experiments. But I made the receiver module in this time, unfortunatly with the same opamps on the breadboard because they were the only ones I had.
Maud is asleep so I can catch up with what you wrote. Unlike you who has a final purpose in mind for this challenging project, my attempt at it is for amusement only and to keep my mind active. Every so often, I have to pluck up the courage and put these breadboards in the boot of my car and take them to the waste disposal site to make more room in my shed. I grieve for a few days afterwards but one has to be realistic about the clutter they create. I have not found anyone locally who wants them. It is the challenge, the doing, the set-backs, the success which provides the enjoyment for me and that is all I want. Anyway, there is no way my 1930's minded wife would allow me to put such technology on the wall in place of:
 

Attachments

  • bakeliteswitches.jpg
    bakeliteswitches.jpg
    83.1 KB · Views: 39
  • Like
Reactions: DPG
If you decide on which Antex iron and tips you want to buy to do smd soldering let me know. I will then write to them and see if they might send you one to illustrate and review in your videos. No promises but worth a try.
 
Last edited:
  • Like
Reactions: _q12x_ and DPG
mister @marconi you are a funny guy.
Ofcourse I could use a free product, im not against free stuff if possible. But for sure im not hunting anything. And all my videos are a collaboration method of communication. I got a ton of help from a couple guys, including you, through these movies I made. This is the MAIN purpose of them. Not to make some comercial bull_sh_t propaganda. Again, and try to trust me, i know you are skeptical, and is healty to be, but sometimes trust by word, especially me, when I say, that what i do, i do it for me. And I am very glad that people likes my project, but that is outside the scope. What is the most important is that I like this project and Im leading it as long and as strong as I can. It's not easy. It is very hard in fact, and very slow.
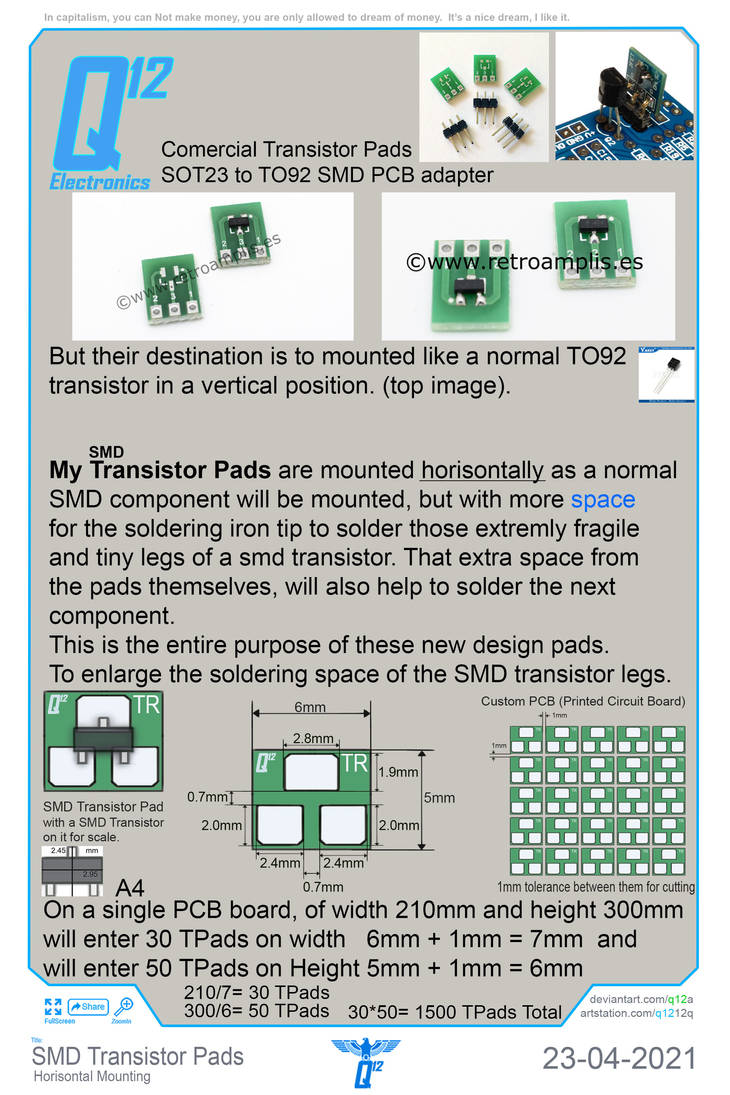
I managed to make the pads for the smd IC, at least 4 of them on one side. That was mind blowing hard. I tried many permutations and many frustrations attempts. But I get it. I had multiple ideas and also implemented some that didnt work with and how i imagined. Aaah... my back hurts. The conclusion is that Yes, it can be done , but is crazy hard, and definetly not the way to do it too many times for multiple IC's. I dont want to think on IC's with more than 4 pins on one side. Horrible to do it as Im doing it. Trust me. So yes, it is possible, but very hard and very slow to make it. I'll have to think on other more "faster" (nothing is fast in truth) and more easier way to assemble these little black devils.
I knew about these adapters that you mentioned but you know, when you concentrate on something, you tend to forget everything. So your idea was more a reminder and a great help in the same time. I am thinking now, after my HARD manual attempt, to more seriously include them in my designs. I'll have to check the prices now, or go to version 2, buy some copper plated fiberglass and make them myself. I will need in order of hundreds. 100 for the start, but 200 to be on a safe side and if im lucky to find them VERY cheap !!! That's the most important prerogative for me - VERY cheap ! I didnt searched for their prices yet, its the next thing to do next.
And for my current projekt I have 2 realistic options now. I must finish it fast (days), so either I will use the DIP8 package or these very hard to make little experimental pads I did so far for the smd IC. Damn it, they are so hard. I wish they were not so hard, but they are. It's so much easier to work with older components than with smd's !!! Trust me on this.
 
  • Like
Reactions: marconi
also, mister @marconi or other guys that may look over this thread, can you throw a quick search on YOUR favorite online market and find me the CHEAPEST price for "100pcs sop8 adapter" ?
I already give it a search right now and the cheapest possible prices +transport tax I could find for me is 2.68US$. Also, be careful there is product price + transport price, so in total, these 2 must be the cheapest ! Ok? And thanks!
for example, this is what i got: US $2.06 / lot (100 pieces) & Shipping: US $0.62 so in total = 2.68$ at least for my country but it must be very close to this result for you as well, in UK.
Maybe im in luck and you can find it for 1$ ! Worth to ask.
 
i understand, so that is the cheapest you could find. Thank you for your search !
 
I put an order for the adapters after all, they were cheap enough. Its just mind blowing hard, making it manually. Oh boy.
 
  • Agree
Reactions: marconi
The receiver module, working just perfect from first built and try. Just excellent.
20210416_110649.jpg


And now the transmitter with 2x555's. You can see those small pads there. So hard to make and place them. So hard.
20210416_110848.jpg
 
  • Like
Reactions: DPG and marconi

Nice work and splendid progress.

mister @marconi you are a funny guy.

Do you man funny haha or funny peculiar? ?
 
  • Like
Reactions: _q12x_
Thank you ! Though is a bit too overwhelming hard and the little pads, with way too many problems. But the good news is, it can be built like that as well. Hard but possible.
You can see in the right side some black marks, is because the solder does not stick after awhile. Problems. But it seems ok so far. It is not my first smd IC that i worked with, but is a first with all the pads mounted. What a hell. And I have a second one to make as well.
This one is clearly a test as you can see it sits by it's own. I can easily integrate it on the main circuit board now that has all its pads.
If you zoom in the image you can read its a 555. Heh.
20210416_160926.jpg
 
  • Like
Reactions: marconi
I remember visiting a US electronics manufacturer called Allied Signal and being astonished by the automated line which produced circuit boards, inspected and tested them and then sent them off for environmental stress testing - without any human hands touching the boards.

Here is a youtube clip of another firm's production line which I thought you'd enjoy watching.


The printed circuit boards in the equipment I am familiar with were multilayer boards in order to make all the necessary connections, so crammed were the the boards with ics. Quite how this was achieved I must one day look up. I know they cost hundreds or more £ pounds each. Costing so much they were often repaired where possible to do so.
 
  • Like
Reactions: _q12x_
Thank you for the video, very nice and I watched a couple of similar ones in the past. I know about their real existence and how cool they are.
So, mister @marconi I am in need of your assistance. If you can, of course.
It is a side project but is still important to get it rolling. I mentioned I have a pickit2 ready and 10pcs of PIC 12f508.
I stay like 14h to figure out how to install all the necessary software for pickit2 and to actually see the pickit2 listed as normal option to select, because it was gray out and I could not select it as an option. In MPLAB :
Screenshot_1.jpg

Again, I did this thing in the past, and programmed some 16f84A and some others, but not many.
Now that my pickit2 is alive, all I need is the correct stuff to send to it and to it's 12f508 that I installed on a "pickit2 DemoBoard" exactly like this one:

1618642065297.png

Please tell me what to start to send to it.
I started with these lines yesterday.
As you can see, PICkit 2 is recognized.
Screenshot_2.jpg
But I am not sending something important to him in the code. And I have no clue what is the correct way to send instructions anymore. Maybe you can help me. I know I made it work in 2001 with a special "recipe" in the beginning. But I dont know what it was anymore. Or it was only for certain PIC's like 16F84?
Or at least where to look and search how to transmit the correct header or start of the code?
Thank you !
If I try to program it, I get this error: (the red line)
1618643361312.png
 
Last edited:
And here is how it looks in reality.
The position of the PIC chip is correct, it's chip key pointing up towards the pickit2 black thing programmer.
The leds are connected through those 4 white jumper wires, because this is a 8pin chip and you have to rewire those pins.
I connected:
07-10 = RA0-RC0 = led1=DS1
08-11 = RA1-RC1 = led2=DS2
09-12 = RA2-RC2 = led3=DS3
03-06 = RA3-RC3 = led4=DS4
20210417_101147.jpg
 
Good morning. I would have to do some reading up first - quite a bit - before I could begin to help. I will see what I can do but it would be at the expense of my Version 3 so I would prefer not to. You might want to ask elsewhere for an earlier response. I have not used a Pickit before. One day I want to buy a Raspberry Pi but at the moment I rather like doing digital circuits 'long hand' using discrete logic ics.
 
Good morning and thank you for your response.
If you didn't work with this kind of hardware then I will not put you to trouble.
I will ask somewhere else then.
Here is the datasheet for this particular pic 12f508.
Maybe you have luck and you can find the initializing code for it. Take a quick look, maybe you are lucky. If not, then is good that I try it through you as well.
That code that i write there is from other codes, I didnt look (too hard) in this datasheet yet. I did peek in it but not for too long. But I will in the end if nothing else come out.
 
Section 9 page 65 of 110?
 
As an alternative, I forget to mention, this is the entire list of PICs I have
12F508
12F629
16F505
16F690
16F84
16F684
but 1 of each, exception for 12F508 where I have 10pcs.
 
Is there a forum group for the PICS where you could ask a question? Or even the Manufacturer's help line? I am of no help I'm afraid to say.
 
  • Like
Reactions: DPG
Is there a forum group for the PICS where you could ask a question? Or even the Manufacturer's help line? I am of no help I'm afraid to say.

I'd agree with Marconi, check out a more relevant forum. It's over twenty years I think since I programmed PICs, so I won't be much help either.

I used a home made programmer, a very simple one if I remember rightly, to program 16F84s I think. Or was it 16C84s maybe. Anyway, I'm waffling now, but hope you get it sorted.
 
  • Like
Reactions: marconi and _q12x_
I used a home made programmer to program 16F84 as well.
But I have all these 12F508 and I want to use them in some very smart little projects i have in mind.
I managed to built successfully a 16f690 with an older program i had saved there. But nothing on the demoboard, the 4 red leds are not doing anything, yet. I have to figure out the protocol which i totally forgot.
Im not sure exactly what i did back then. I think those saved (working) files were working for this pickit2? or for a serial port? I am not sure.
 
I made it work. It was simply some file management I had to pay attention. Now is working fine. Thank you.
 
  • Like
  • Winner
Reactions: marconi and DPG
Thank you for the update. I have constructed the three regulated power supplies for Version 3 (+5V logic, +12V and -15V for the op amps and comparators). Now they need testing.

My progress on V3 will halt for a short while because my wife is in hospital, we have a new puppy and I have a new project starting for a client who wants to install a Ground Source Heat Pump to replace his oil fired boiler. He will soon have the solar photovoltaic panels ( 2 x 5kW systems) I mentioned before and already has a solar thermal hot water system. So some thermodynamics will occupy me rather than electronics and I will have to think about the integration of the renewable systems together. :)

I look forward to seeing the wireless remote IR control system in action. Rest assured I will construct Version 3 to see how well it works. I have decided to stick to the flash A-D converter method but use the strobed comparators I mentioned.

Am I allowed to know were you live to city or region level as I did with 'London'. Just adds to the 'pen pal' interest for me to look up on line and in my atlas of the world.
 
  • Like
Reactions: _q12x_ and DPG
  • Like
Reactions: _q12x_
Good luck with the heating system project. If you need good ideas, you can talk to me as well. I can return the help.
I am from Romania - Botosani. It is a small town.
I watched your video. Basically, that system is using the heat emanated by a refrigerator to heat water for home appliances. It is a new system I am getting acquainted just now. It is interesting. It is new.
 
  • Like
Reactions: marconi
Many, many, thanks to mister Steve for the remote control module. If it was not him, I could not make it work so good. It's just fantastic when using it live, way batter than my imagination or than watching it in the movie.
A super update:
 
  • Like
Reactions: marconi
Good work - and pleasing to hear you are happy with your achievements.

How does the remote perform when there is sunlight or high ambient IR in the room? I am interested to know because that is what I am tackling with my Version 3. I have made slow progress this week but some nevertheless as I illustrate in the attached video which shows 5, 0, 12, -15V regulated power supplies and the 555 clock running at 25kHz to run my logic and pulse the LED sensor illuminators.
 

Attachments

  • FullSizeRender 6.mp4
    23.7 MB
Last edited:
  • Like
Reactions: _q12x_
When is exposed to sunlight it is absolutly no problem
We take care of this problem by pulsating the signal from the remote in a band of 33 something. It is definetly not my domain. We first made it with 2x555's and then with a PIC 12f508 , basically doing the same thing the 2x555 did before but with way less components. As you could observed from the movie.
By the way, VERY COOL osciloscope you have there! Very cool. I remember you mention it to me before and it was quite cheap.
I will probably have to make a movie about how i made my remote, because like you here, I did the exact thing, I put my osciloscope to the circuit and veryfy the hell out of it until we figure out the bugs and it worked perfectly.
And yes the square wave you have on your osciloscope I have it on my "dinki" osciloscope as well, but your signal is much more cleaner and true. Mine is noisy and unclean. Its the osciloscope I use.
I will have to think to make the presentation video... phui... hard stuff. But it must be done.
 
As you begin to think about and design your motorised wings features, have you done a quick measurement and analysis to find out if your current power supplies can cope with the extra load when they operate?
 
  • Like
Reactions: _q12x_
As you begin to think about and design your motorised wings features, have you done a quick measurement and analysis to find out if your current power supplies can cope with the extra load when they operate?
Very good question !
But that was one of the first things I took in consideration.
My power supply that is over the door, the one that is powering the Led Wings, is marked as 5V 2A. It happens coincidentally that I just took it out yesterday and installed an indicator green led on it. Also I checked its power settings in this time so I know for sure now. I usually forget things along the way. But I know so well now because of the update yesterday.
I also took your advice and go to microchip forums and open the discuttion about PIC's there, before, when I was in trouble. They kind of helped but mostly I figure it out myself alone, and some help from mister Steve, my good american friend. He literally stay all the time near me, and poke with me this thing, until we made it work. If I was alone it would have took me much more time to figure the PIC out, but with him, I think I speed it up considerable. I work best when I have good people around me. If i'm alone, as you can see and know already, i am VERY slow. Because I am an artist, not an electrician or electronist.
I didnt think on the "movement" part very much yet. I only have 2 ideas so far. And they are complex and hard as f.a.c.
Idea #1 the wings from cardboard moving by means of memory wire (which is very expensive and I dont have it) OR my little motors I already presented, those vibrators motors I hacked.
Idea #2 a "smart" ball. Something like these image references :
1619256226852.png
1619256288530.png

And actually to follow me around, when Im walking in my room.
But this is a very complex task I might not be able to accomplish and I know it. But is a very nice idea that is on the table, as my saying is. Yah...well. I will conform to what I can do and come with better ideas than these, that are not very complex to make and realistic to make by me and my tools and components I have.
I was thinking to go on a robotics forum for this smart ball. THey might have all the hardware and software already made for such a project. I will see in the future.
For now, is just cool to imagine. Haha.
 
See? I don't lie (haha)

Screenshot_1.jpg

While doing this, I was thinking actually to your light plastic pylons. In this particular case, I really needed one. But.. is good enough as it is. THough from my other table, in the back, the angle is too wide and I can see a little dot of green, almost invisible. But this is not a big concern, im just happy I have this option installed there.
I am strongly recomanding to leave the edit option alive all the time in this forum !!!
- So, mister @marconi , did you like my PIC movie?
 
Last edited:
  • Like
Reactions: marconi
If it was me...... I would take one little motor and connect it to your power supply and full wings board and switch it on and off to discover ’what happens’. Put a freewheeling/fly back diode across the motor to reduce the back emf when it turns off. Might want to try at various 0 and 5 Volt tap off points to investigate volt drop effects on modules.
 
Last edited:
  • Like
Reactions: Wilko
That's not even an issue. Tell me how you would make the smart ball ! That's the real issue.
 
  • Optimistic
Reactions: marconi
q12x I thought you would like to see the shape of the voltage waveform produced by each of the four black 940nm photodiodes when they receive infra red light from the four LEDs pulsed equally on and off at 25kHz. You can clearly see the effect of the reverse biased photodiode‘s capacitive depletion layer and resistance producing a CR time constant which is too long to respond immediately to the ir light being turned very quickly on and off. You can make out the classic CR circuit charge and discharge exponential curves. One way of improving photo response time would be to increase the reverse bias which widens the depletion layer and thus reduces its capacitance thereby making the time constant shorter. The sensor array is picking up the side of the scope.

So, one might have expected nice crisp straight sided pulse outputs from the photodiode but other factors are at play causing waveform distortion.
 

Attachments

  • FD9E82D0-8E07-40D5-826E-34AEF3CDE673.jpeg
    FD9E82D0-8E07-40D5-826E-34AEF3CDE673.jpeg
    398.3 KB · Views: 38
  • FullSizeRender 7.mp4
    21.6 MB
  • Like
Reactions: _q12x_

Similar threads

OFFICIAL SPONSORS

Electrical Goods - Electrical Tools - Brand Names Electrician Courses Green Electrical Goods PCB Way Electric Underfloor Heating Electrician Courses Heating 2 Go Electrician Workwear Supplier
These Official Forum Sponsors May Provide Discounts to Regular Forum Members - If you would like to sponsor us then CLICK HERE and post a thread with who you are, and we'll send you some stats etc

Advert

Daily, weekly or monthly email

Thread starter

_q12x_

DIY
Joined
Location
New York
If you're a qualified, trainee, or retired electrician - Which country is it that your work will be / is / was aimed at?
United States of America
What type of forum member are you?
DIY or Homeowner (Perhaps seeking pro advice, or an electrician)

Thread Information

Title
How to shield a live wire at 240V ?
Prefix
N/A
Forum
UK Electrical Forum
Start date
Last reply date
Replies
384

Advert

Thread statistics

Created
_q12x_,
Last reply from
marconi,
Replies
384
Views
37,441

Advert